> ## Documentation Index
> Fetch the complete documentation index at: https://docs.paymint.dev/llms.txt
> Use this file to discover all available pages before exploring further.
# Paddle Setup
> Connect your Paddle account to Paymint for payment processing
## Prerequisites
Before connecting Paddle to Paymint, you need:
* A [Paddle Billing](https://paddle.com) account (not Paddle Classic)
* Your Paddle account must be approved for payment processing
* Follow the first 4 steps of the [Paddle Setup Checklist](https://developer.paddle.com/build/onboarding/set-up-checklist#setup-checklist) to ensure your account is properly configured.
**Existing Paddle Accounts:** Even if you already have an account, please confirm that your configuration matches the first 4 steps of the [Paddle Setup Checklist](https://developer.paddle.com/build/onboarding/set-up-checklist#setup-checklist).
Don't have a Paddle account yet? [Sign up at paddle.com](https://paddle.com) — approval typically takes 1-2 business days.
***
## Creating Your API Key
Go to [vendors.paddle.com](https://vendors.paddle.com) and sign in to your Paddle Billing dashboard.
Make sure you're using **Paddle Billing** (not Paddle Classic). The URLs should start with `vendors.paddle.com`.
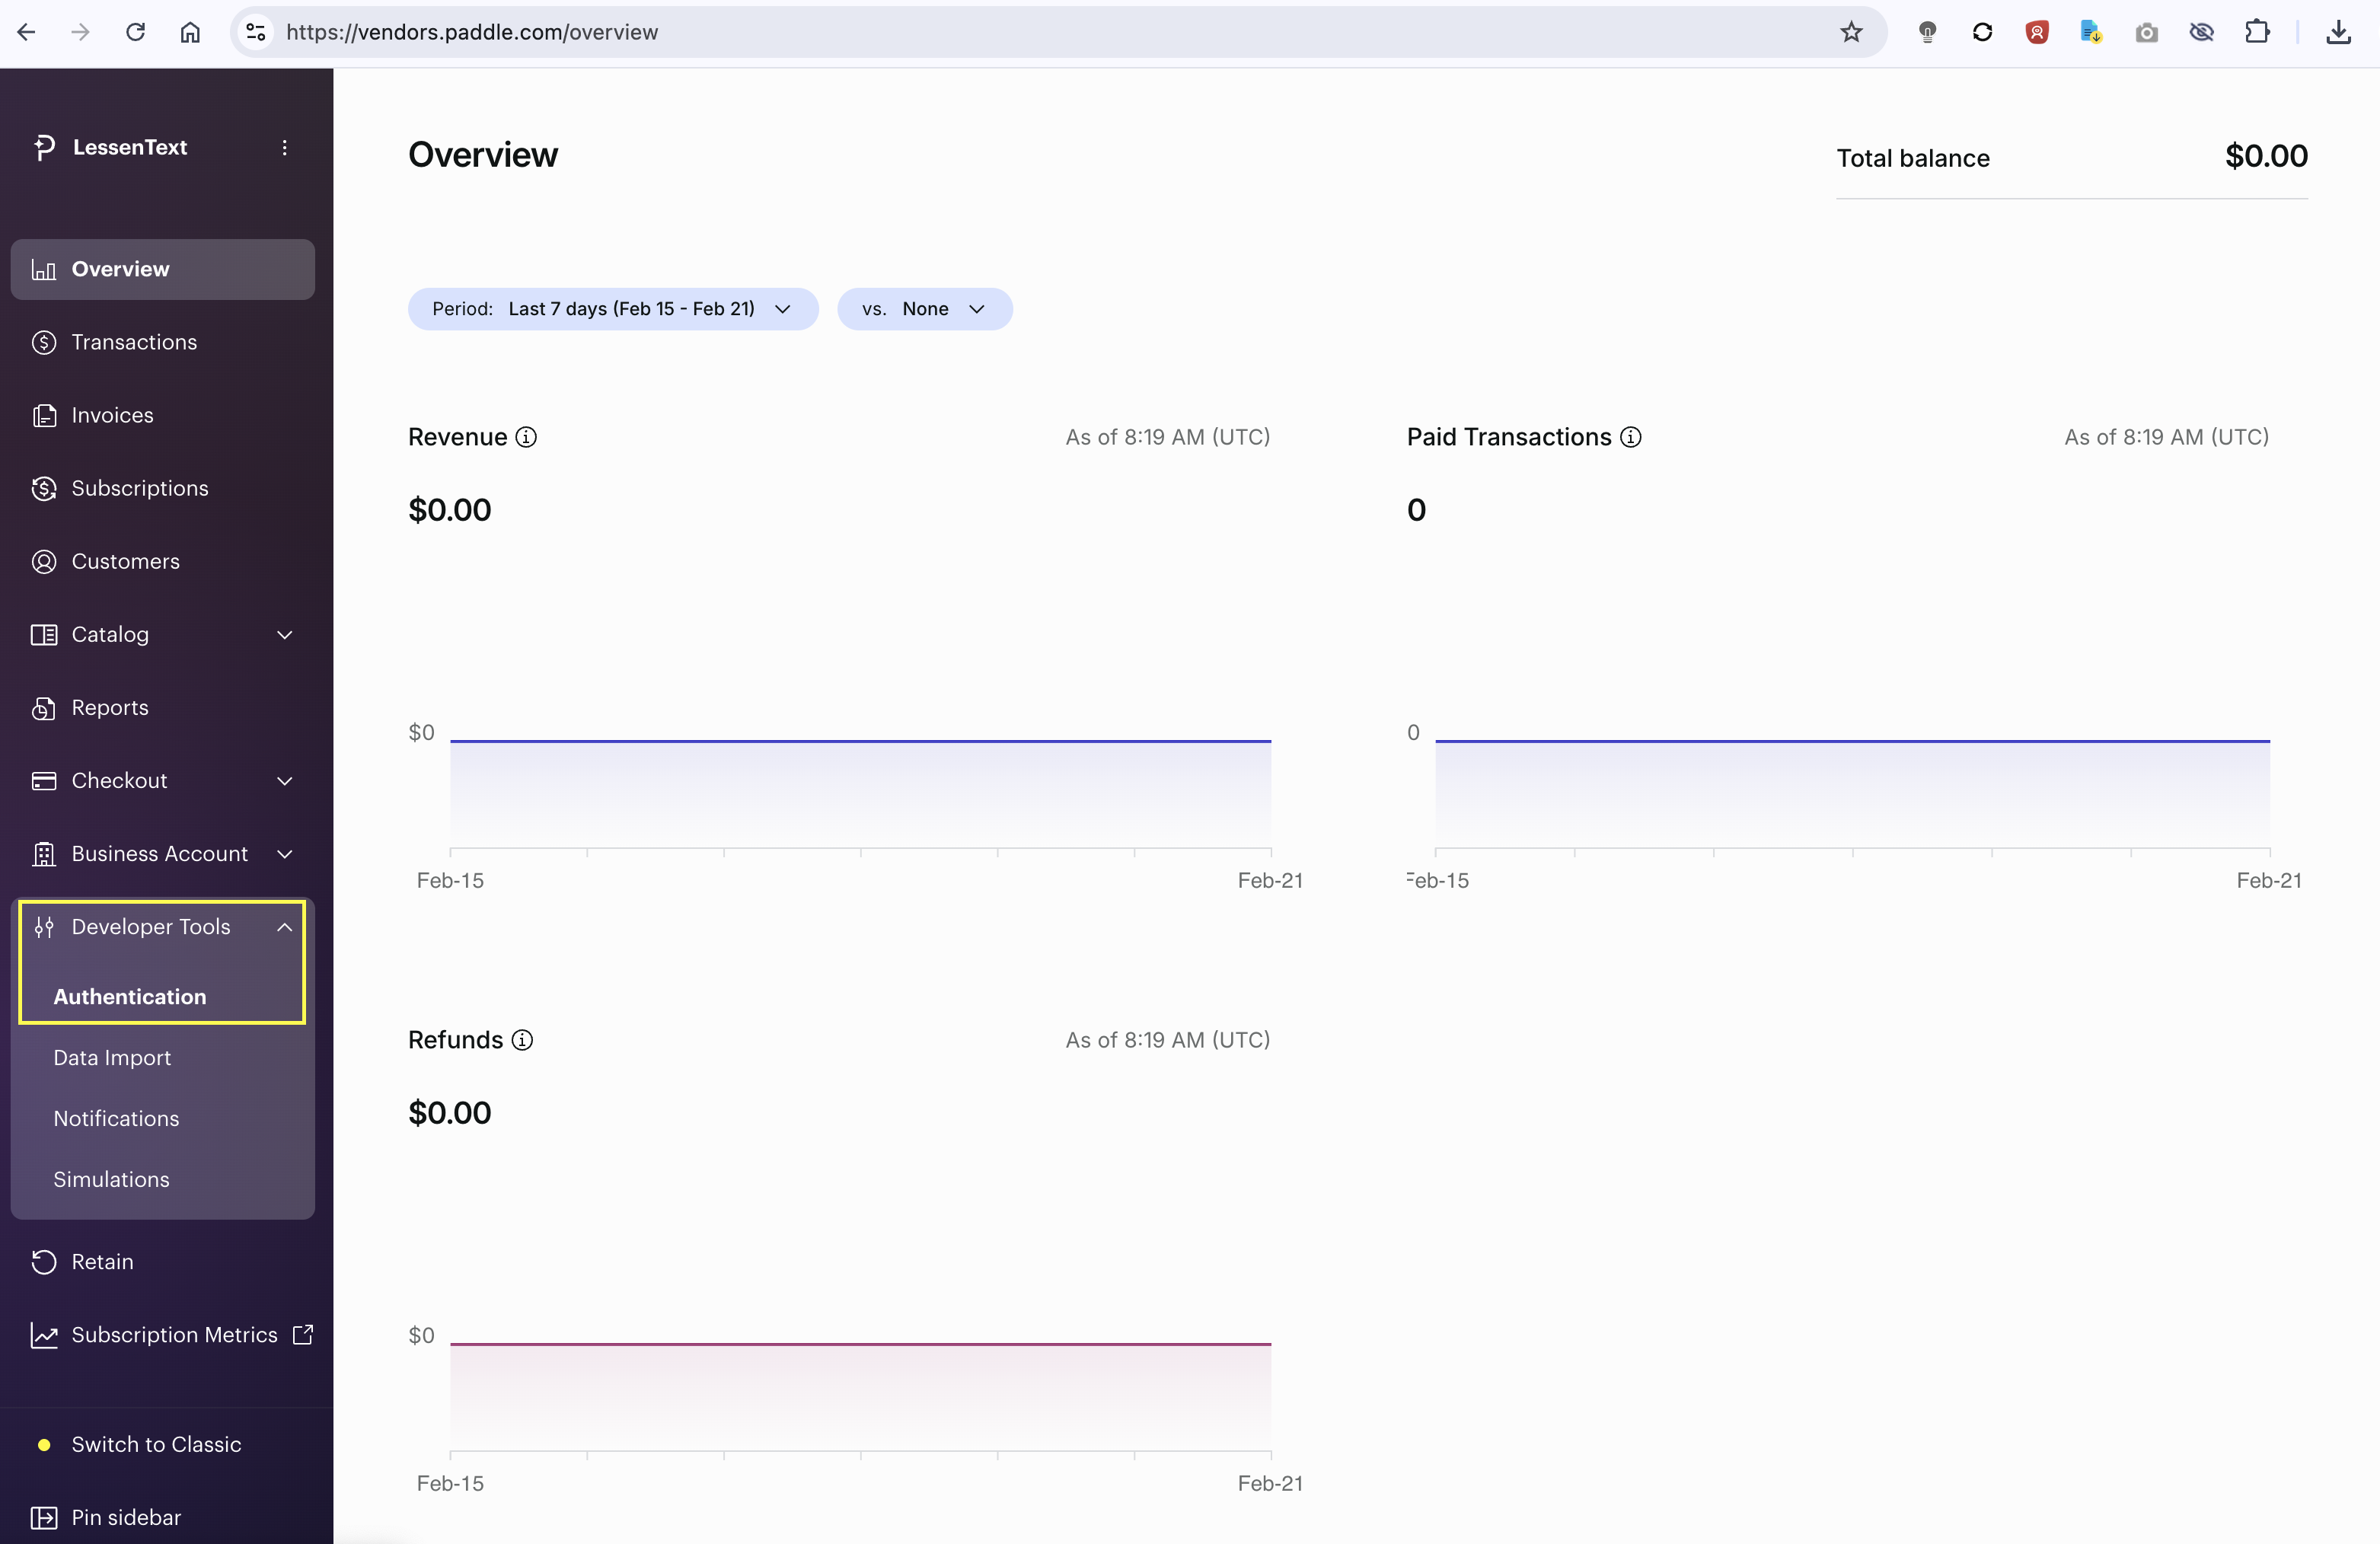
In the left sidebar, expand **Developer Tools** and click **Authentication**.
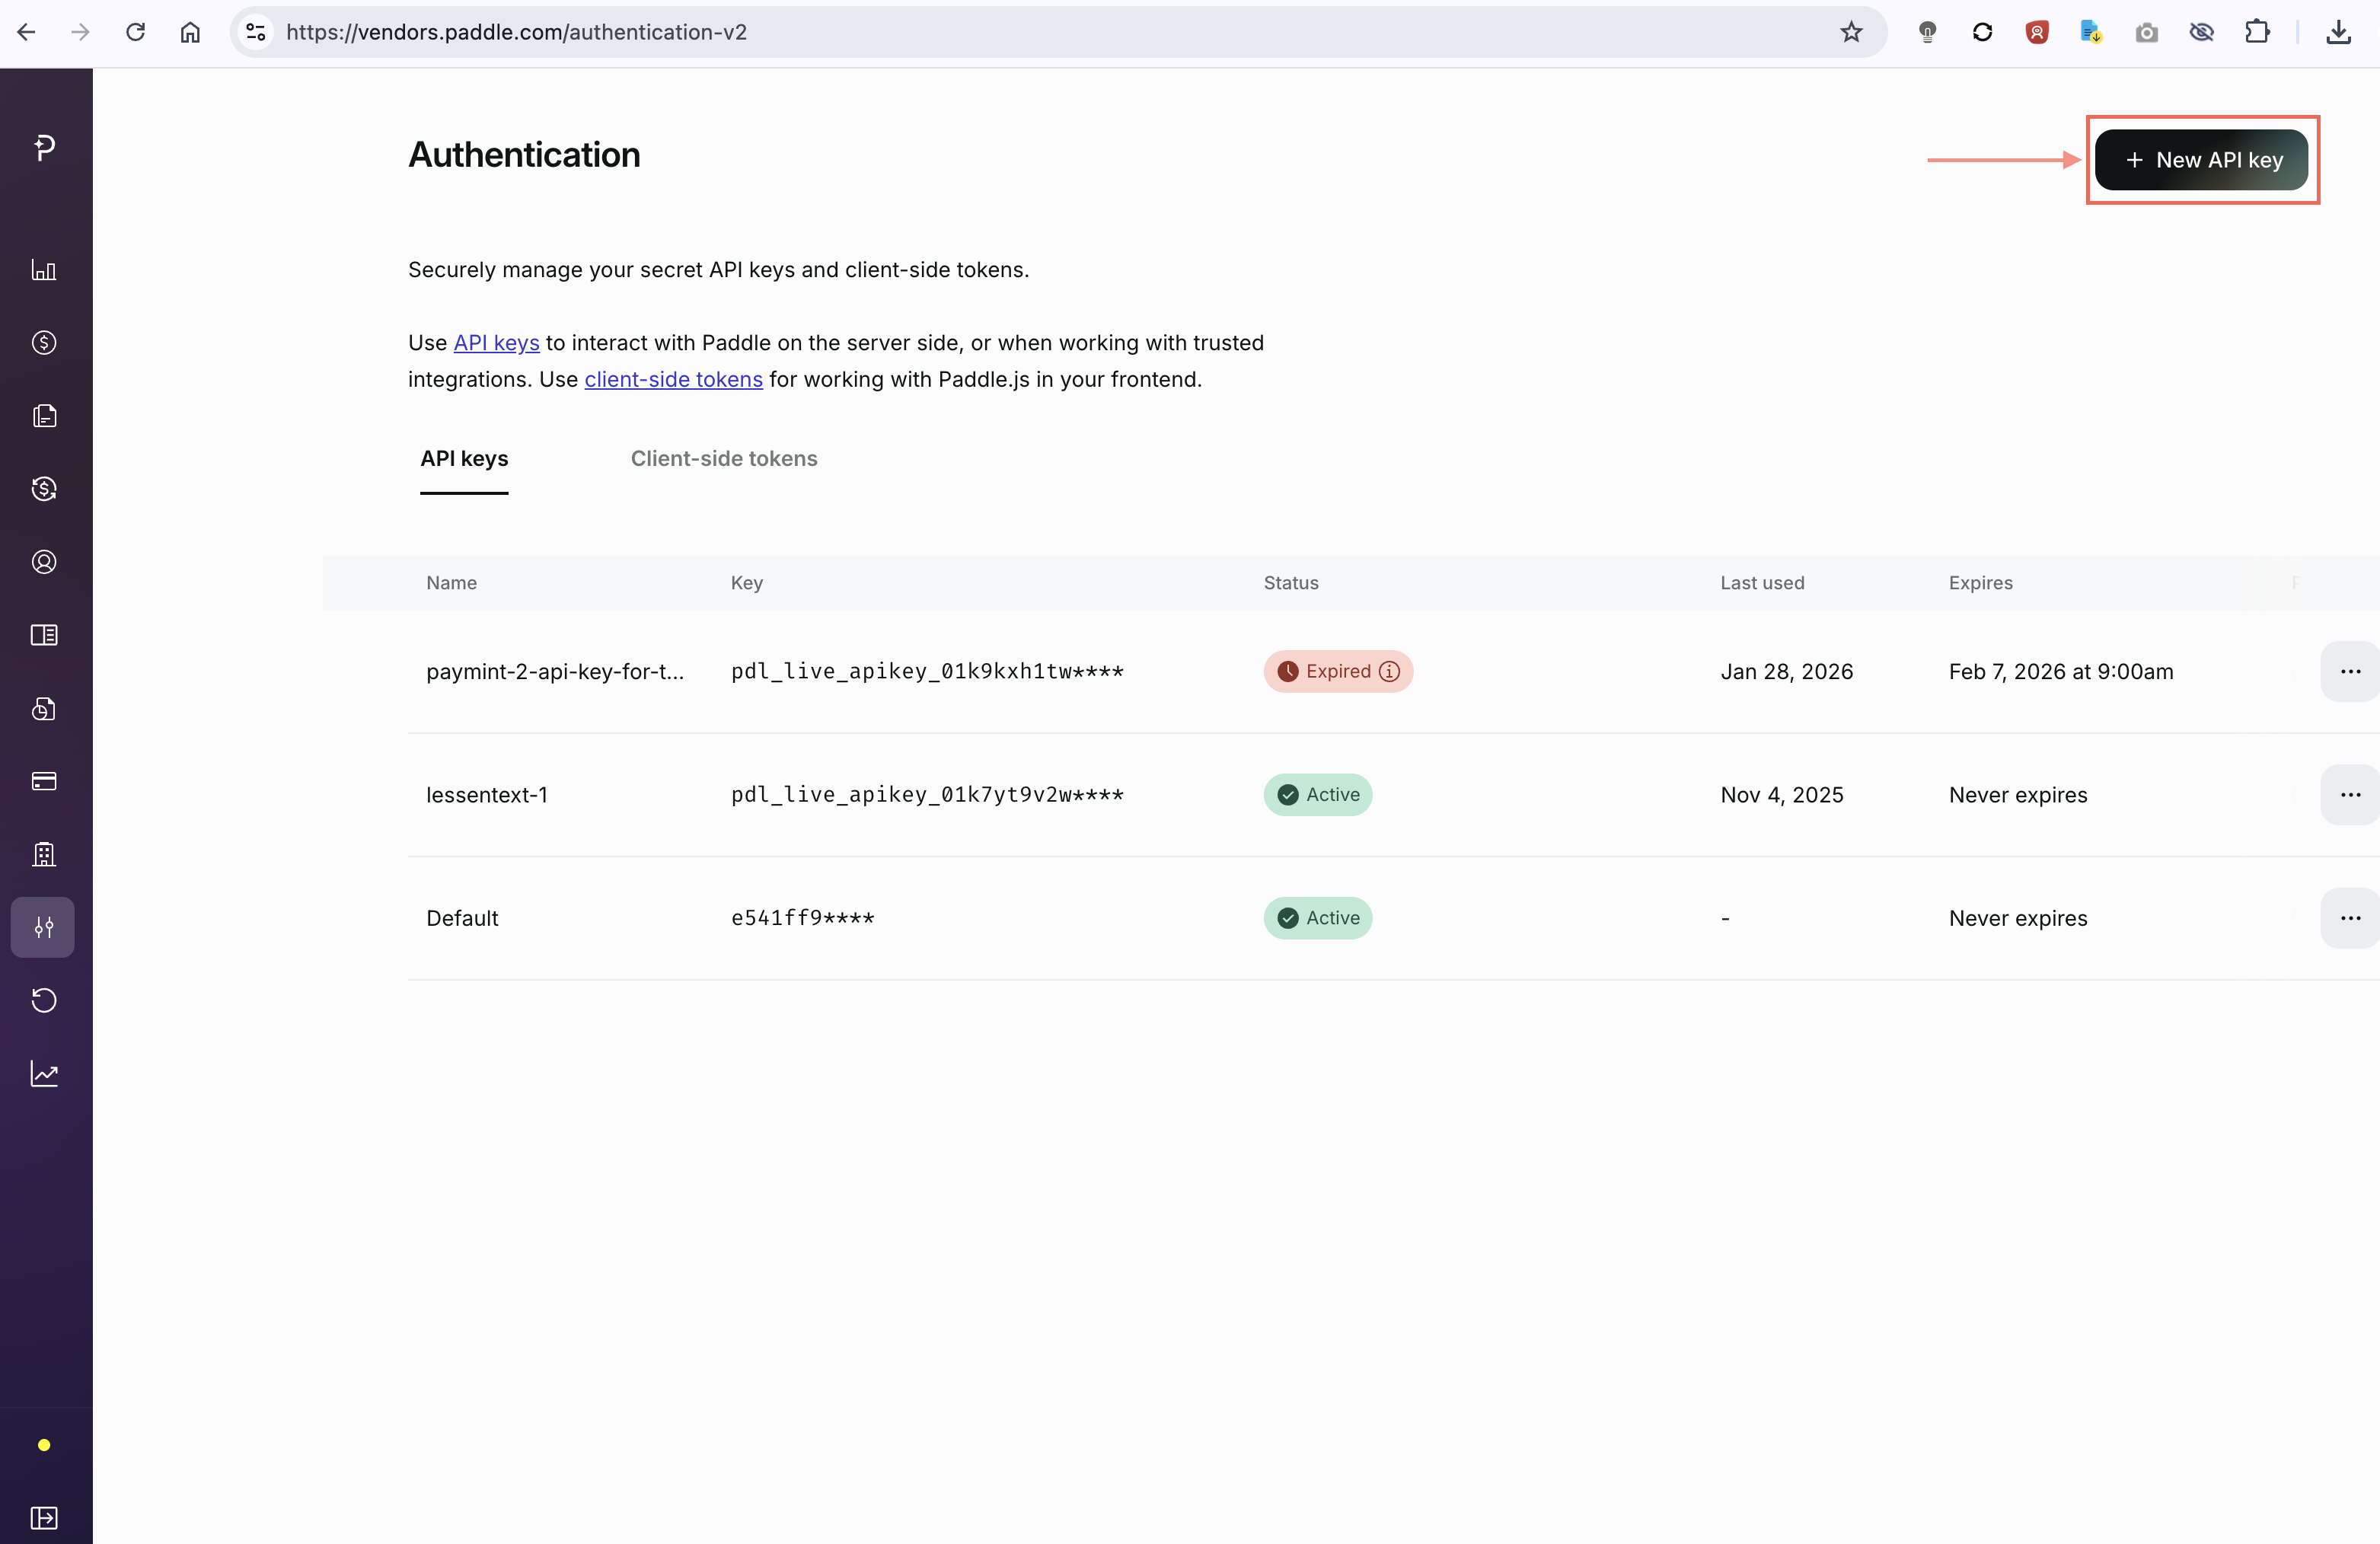
 On the Authentication page, click the **+ New API key** button in the top-right corner.
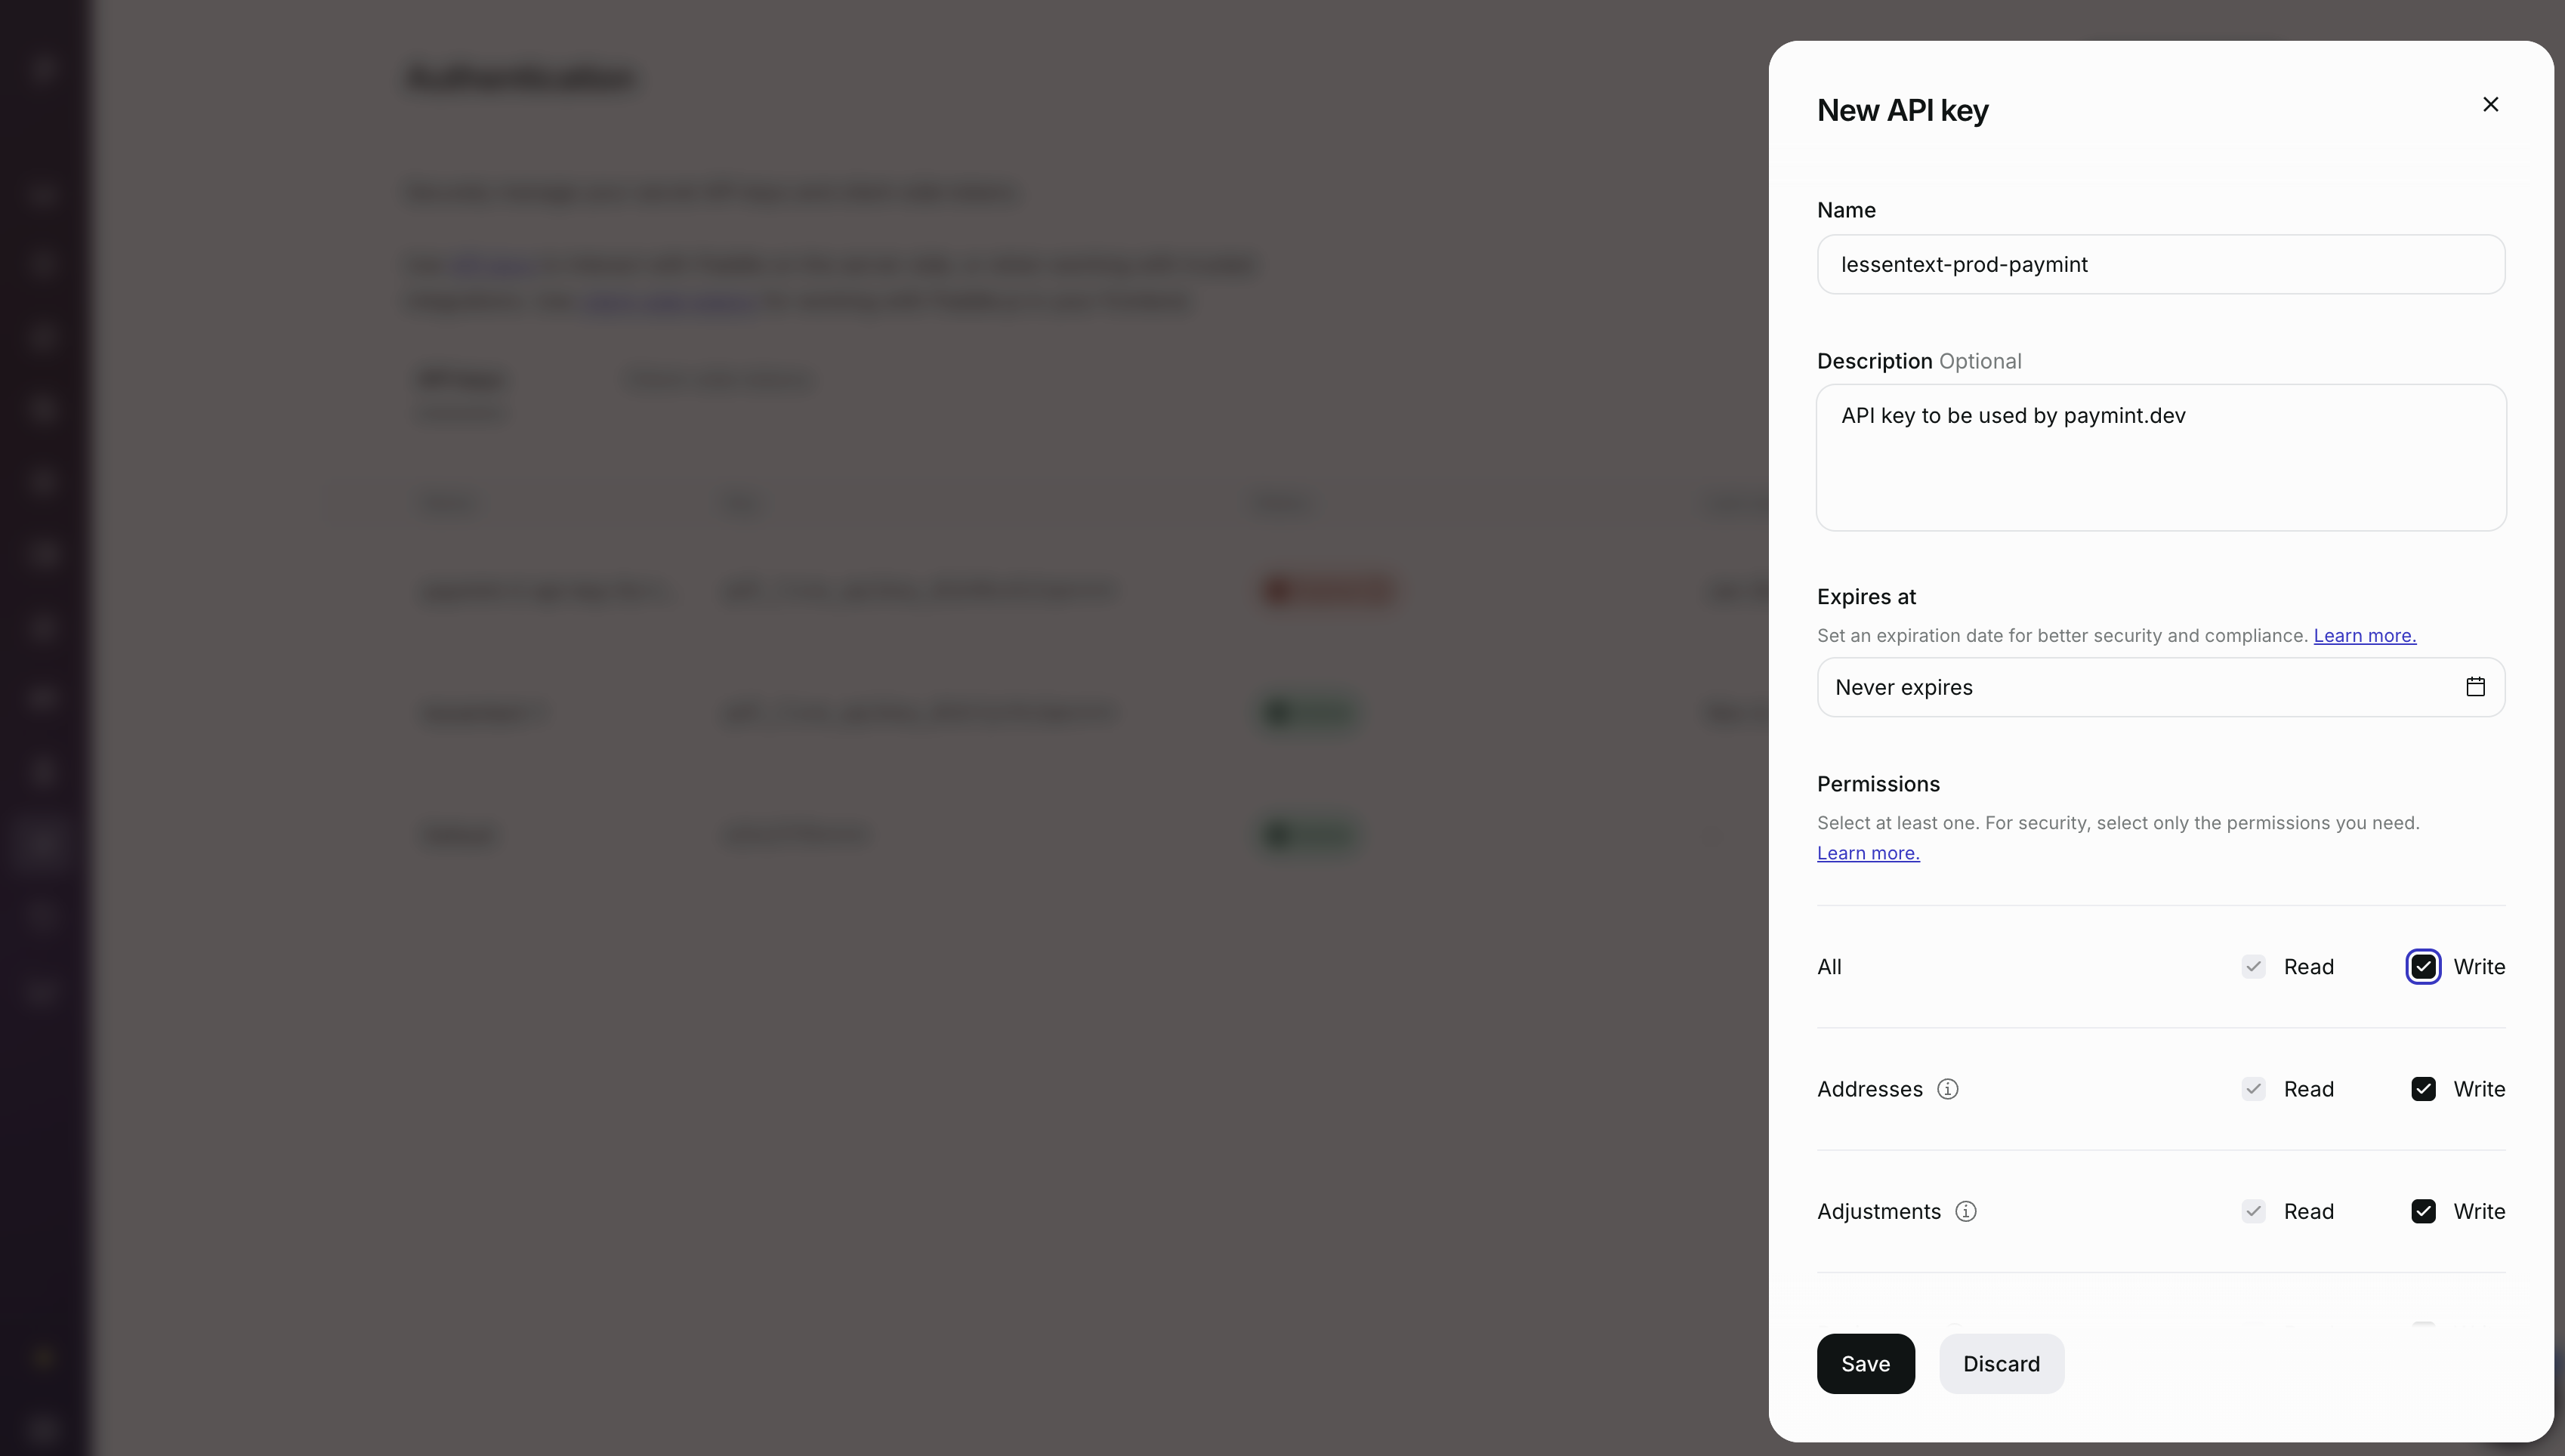
 In the **New API key** dialog:
* **Name** — Give it a descriptive name (e.g., `your-app-prod-paymint`)
* **Description** — Optional, but helpful (e.g., `API key to be used by paymint.dev`)
* **Expires at** — Set to `Never expires` unless you have a rotation policy
* **Permissions** — Select **All → Read & Write** for full access
Click **Save** when done.
In the **New API key** dialog:
* **Name** — Give it a descriptive name (e.g., `your-app-prod-paymint`)
* **Description** — Optional, but helpful (e.g., `API key to be used by paymint.dev`)
* **Expires at** — Set to `Never expires` unless you have a rotation policy
* **Permissions** — Select **All → Read & Write** for full access
Click **Save** when done.
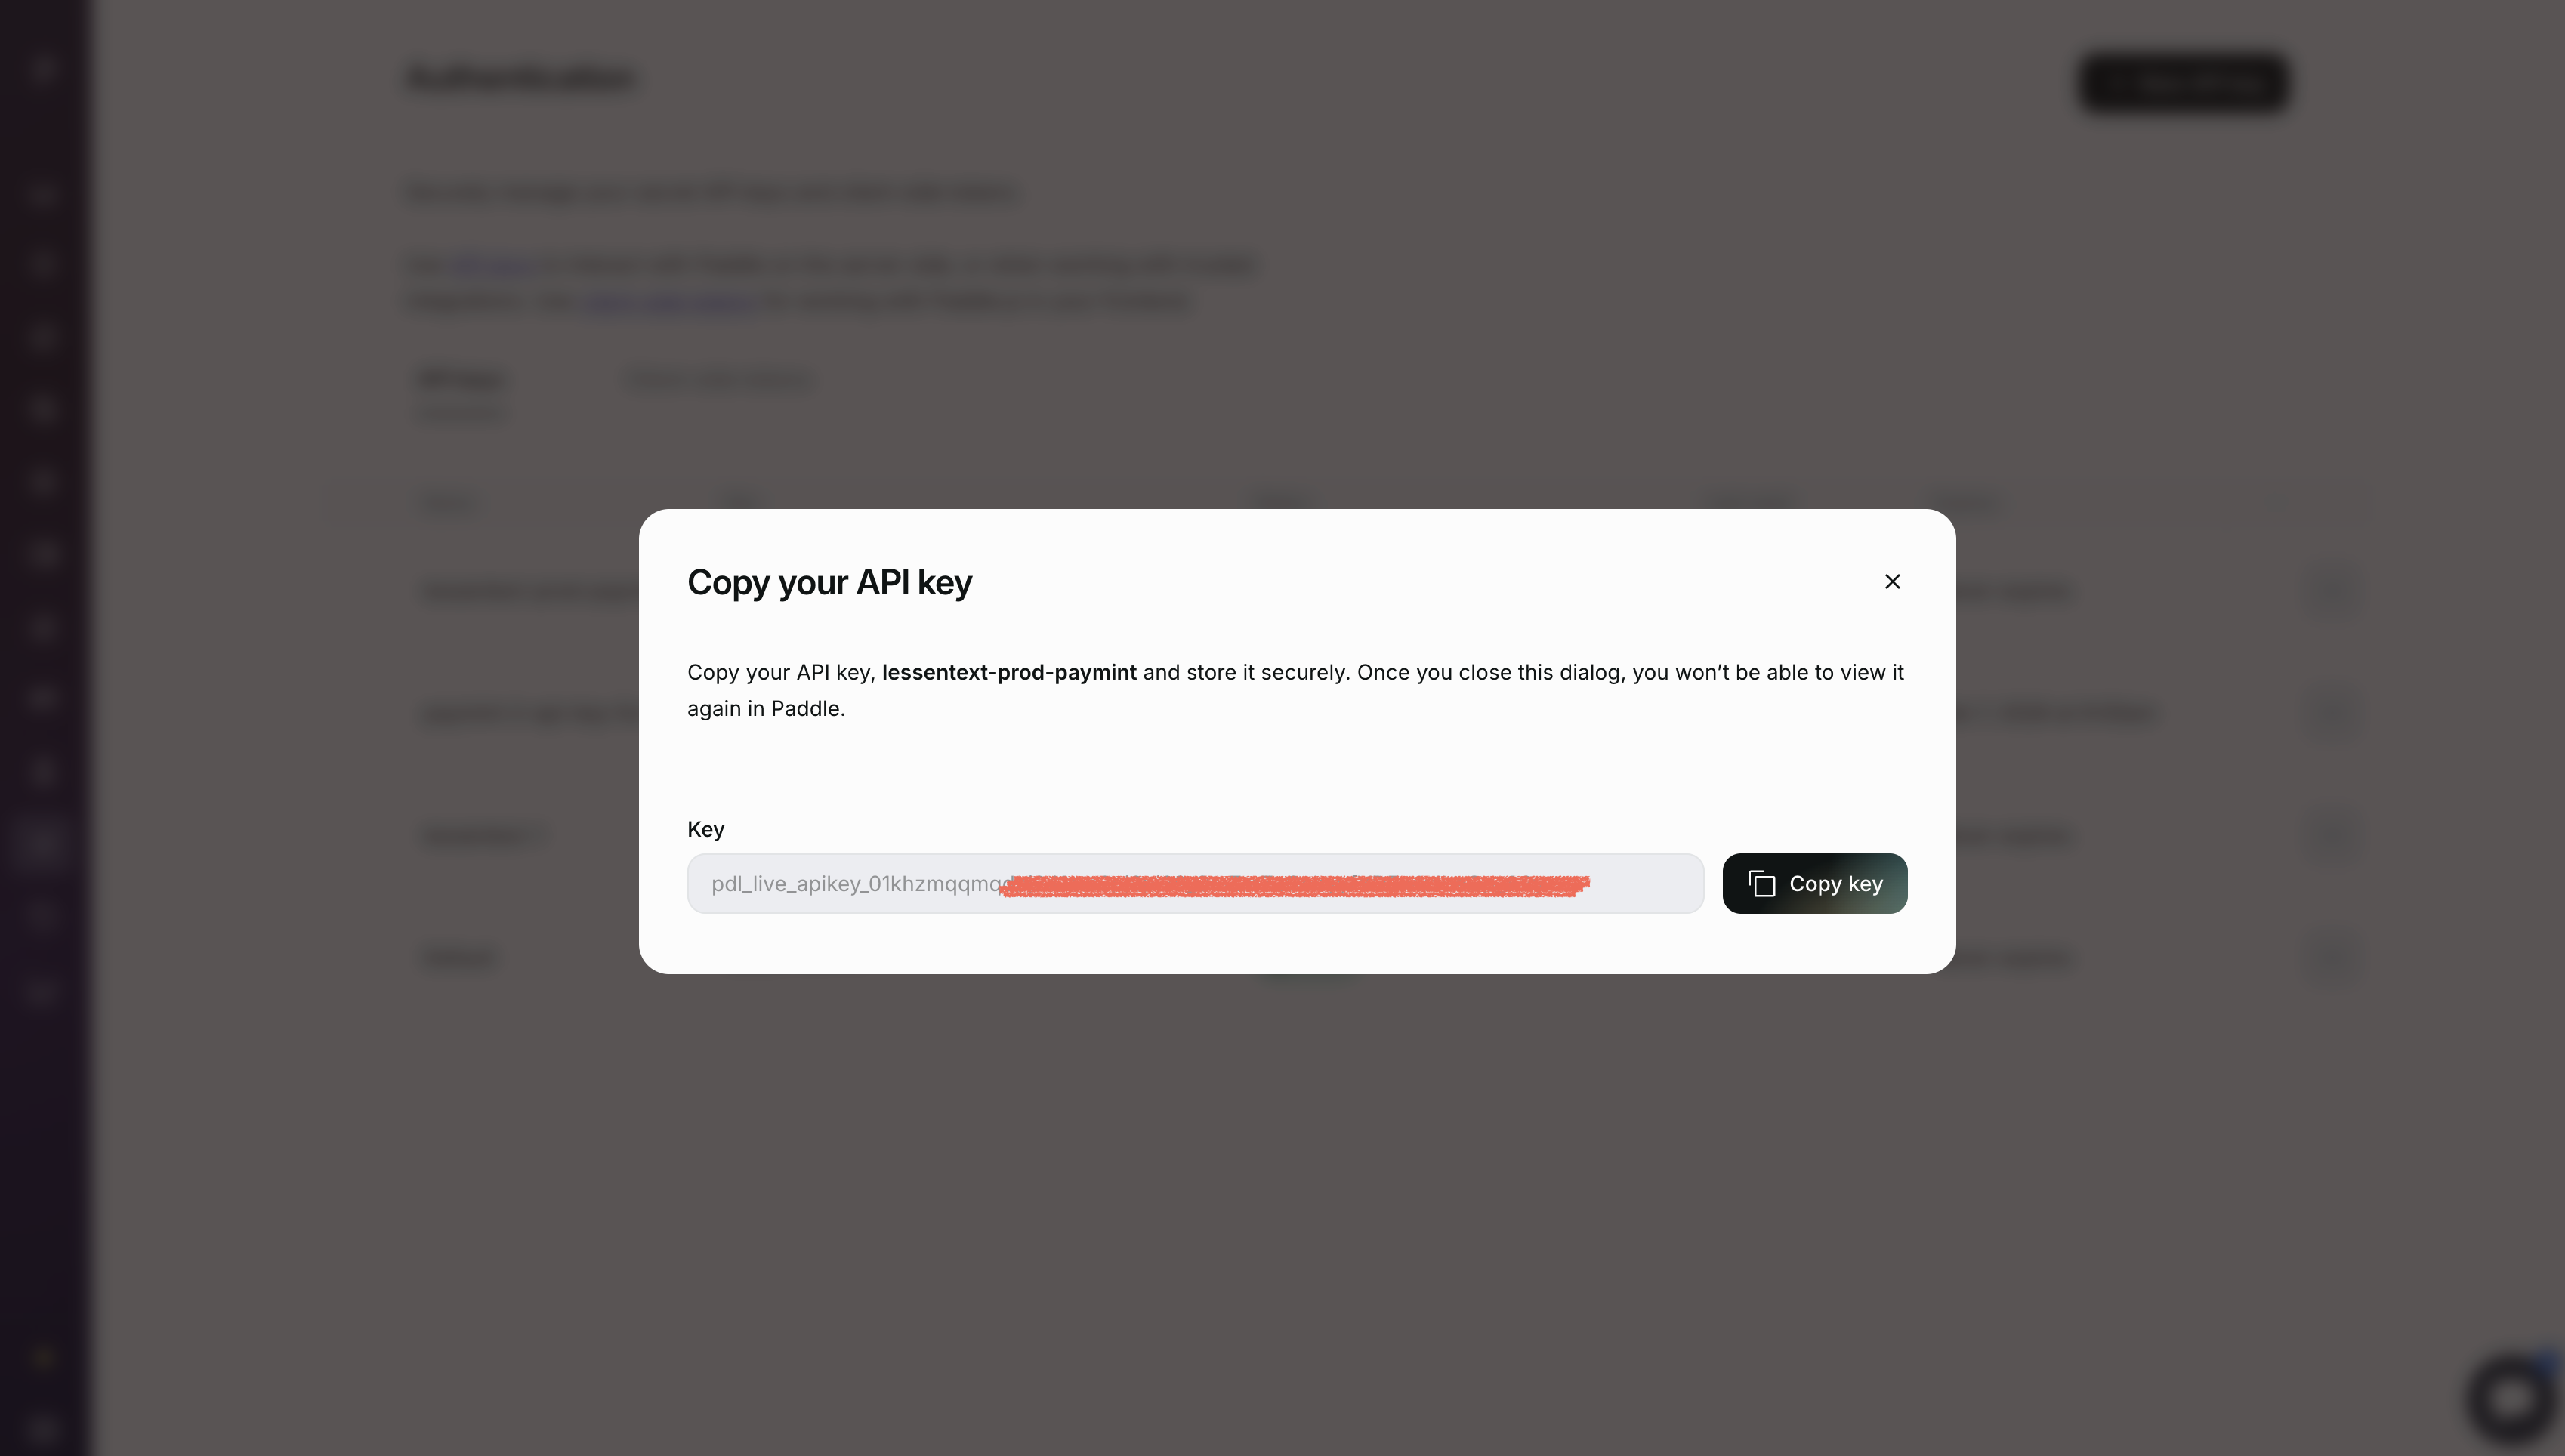
 After saving, Paddle will show your generated API key.
**Copy the key immediately and store it securely.** Once you close this dialog, you won't be able to view the full key again in Paddle.
After saving, Paddle will show your generated API key.
**Copy the key immediately and store it securely.** Once you close this dialog, you won't be able to view the full key again in Paddle.
 The key will start with `pdl_live_` (production) or `pdl_sdbx_` (sandbox).
Paddle has two environments:
| Environment | Use Case | API Key Prefix |
| -------------- | ----------------------- | -------------- |
| **Sandbox** | Testing and development | `pdl_sdbx_...` |
| **Production** | Live payments | `pdl_live_...` |
Start with **Sandbox** for testing, then switch to **Production** when you're ready to go live.
***
## Connecting to Paymint
In the Paymint dashboard, go to **Settings → Paddle Configuration**.
If you're a new user, you'll be redirected here automatically after sign-up.
The key will start with `pdl_live_` (production) or `pdl_sdbx_` (sandbox).
Paddle has two environments:
| Environment | Use Case | API Key Prefix |
| -------------- | ----------------------- | -------------- |
| **Sandbox** | Testing and development | `pdl_sdbx_...` |
| **Production** | Live payments | `pdl_live_...` |
Start with **Sandbox** for testing, then switch to **Production** when you're ready to go live.
***
## Connecting to Paymint
In the Paymint dashboard, go to **Settings → Paddle Configuration**.
If you're a new user, you'll be redirected here automatically after sign-up.
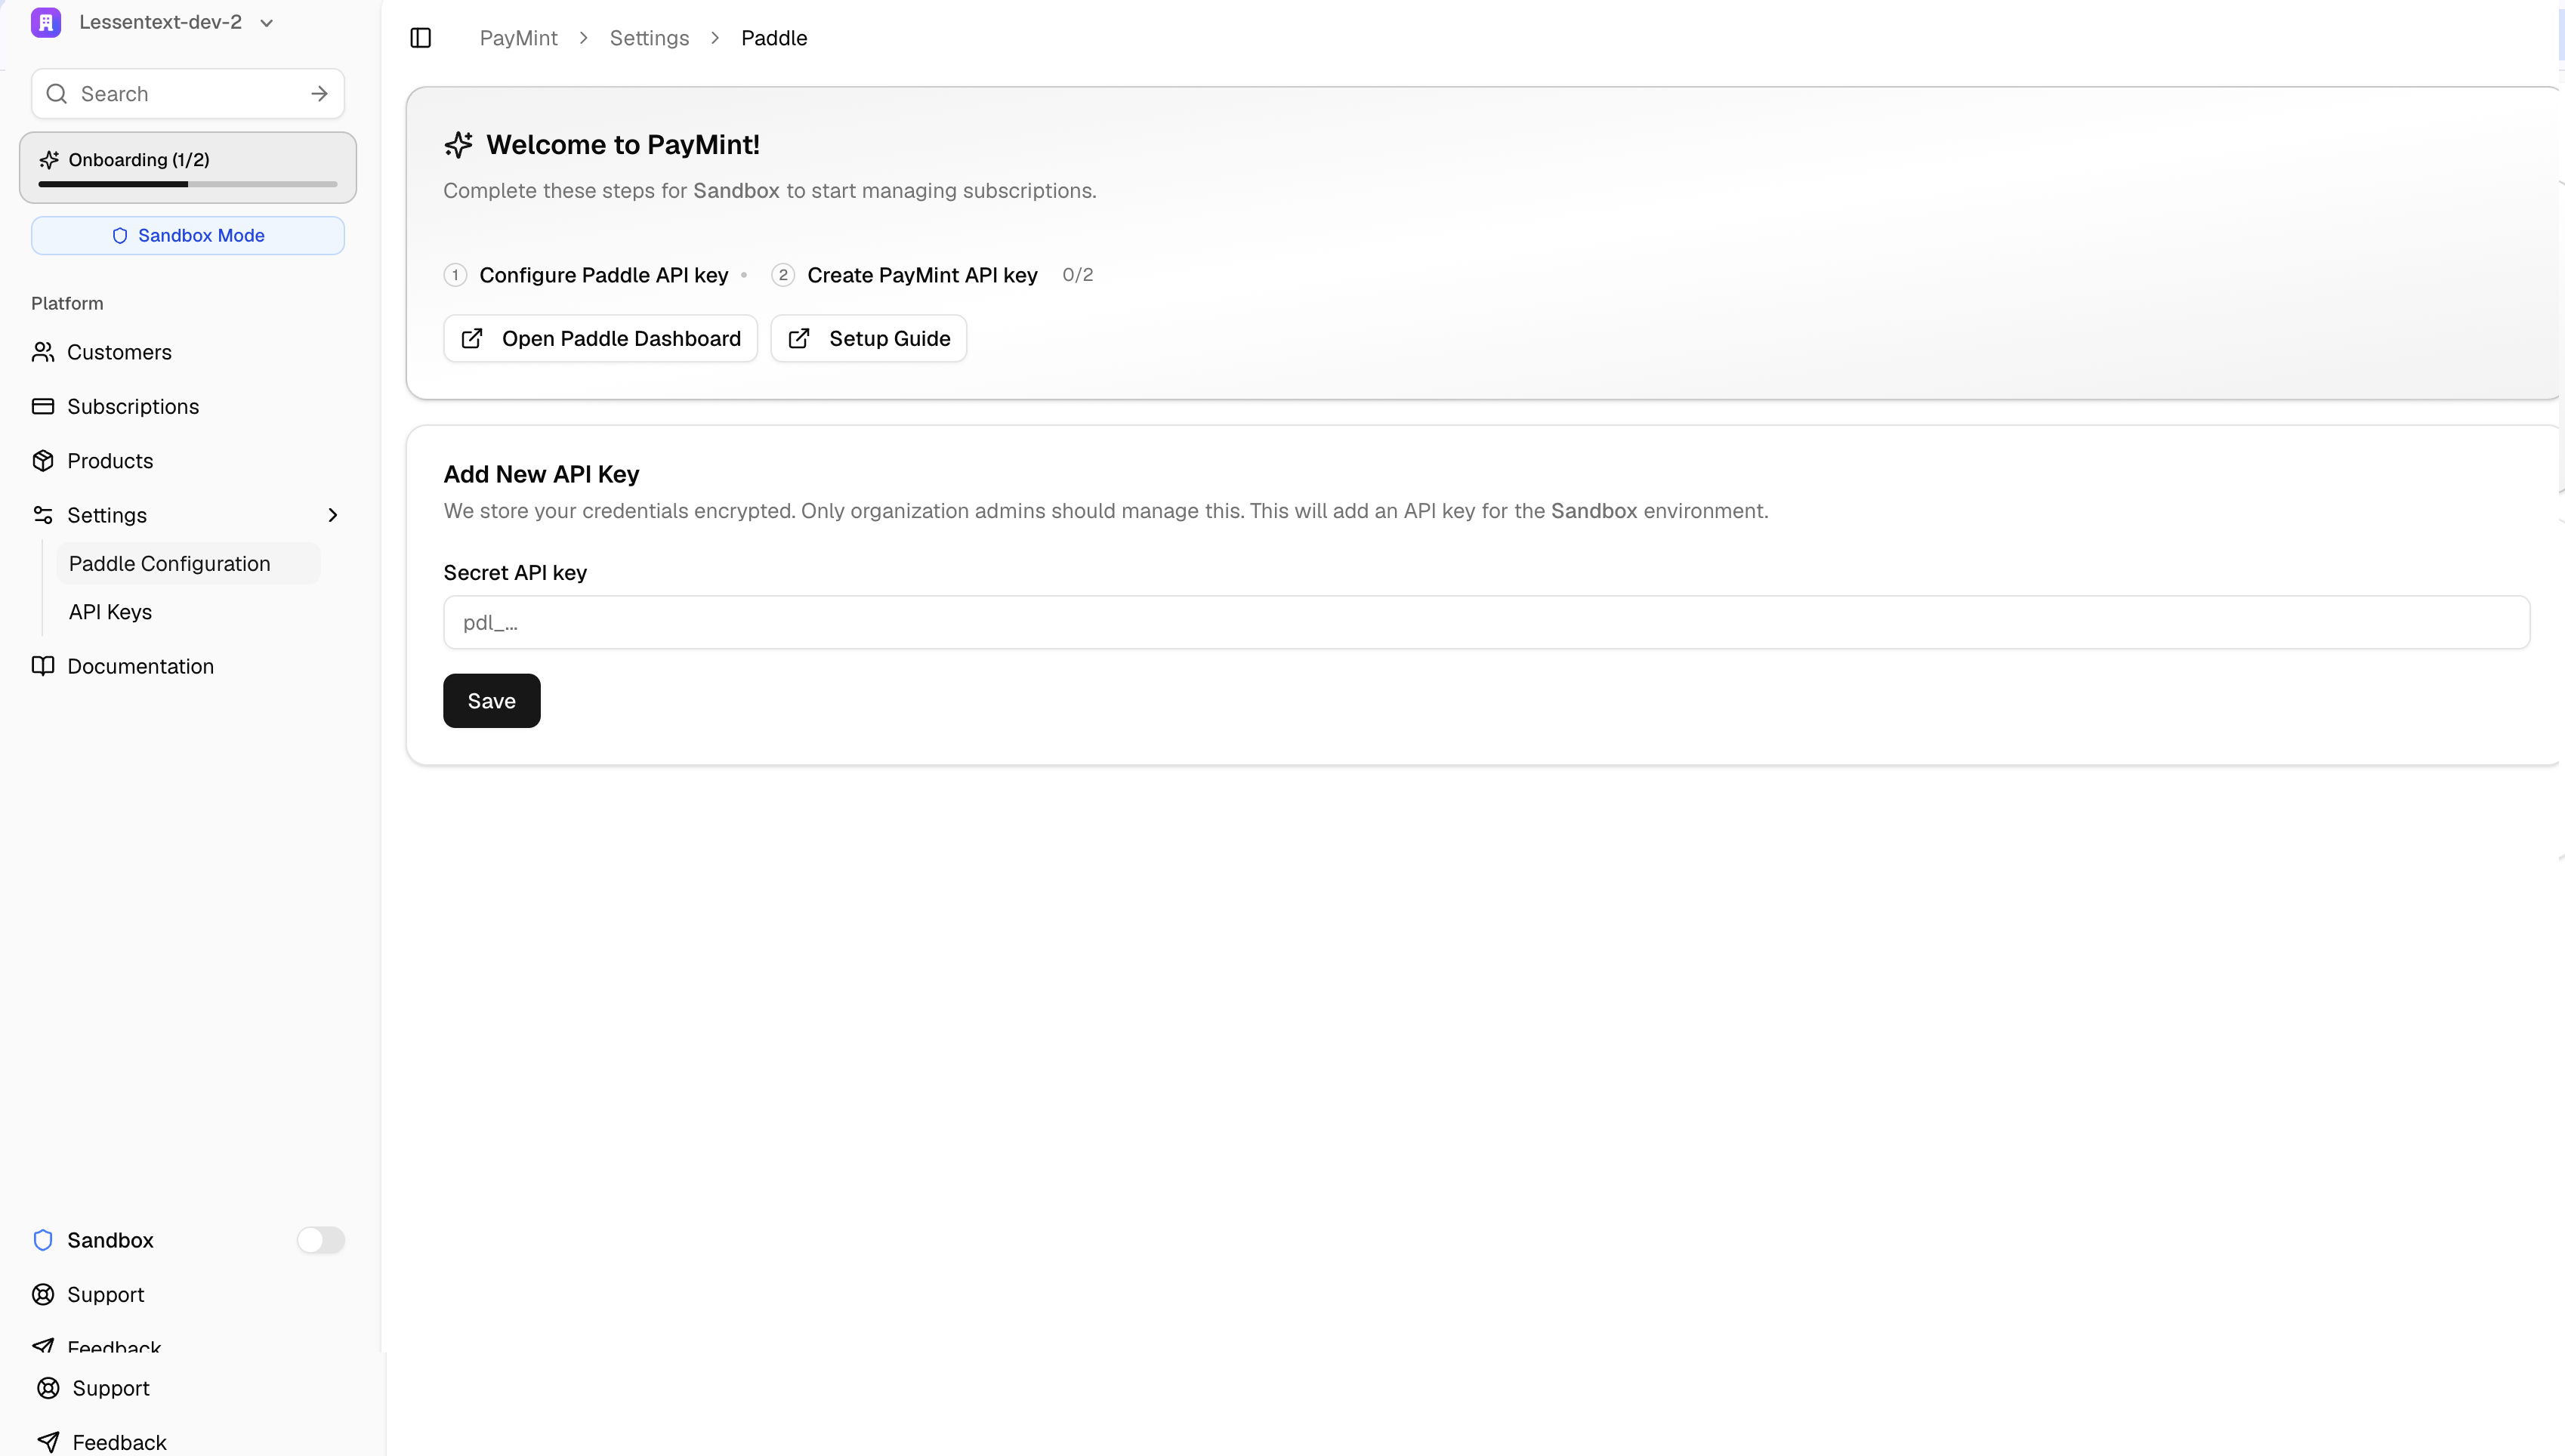 Paste your Paddle Secret API Key into the **Secret API key** field and click **Save**.
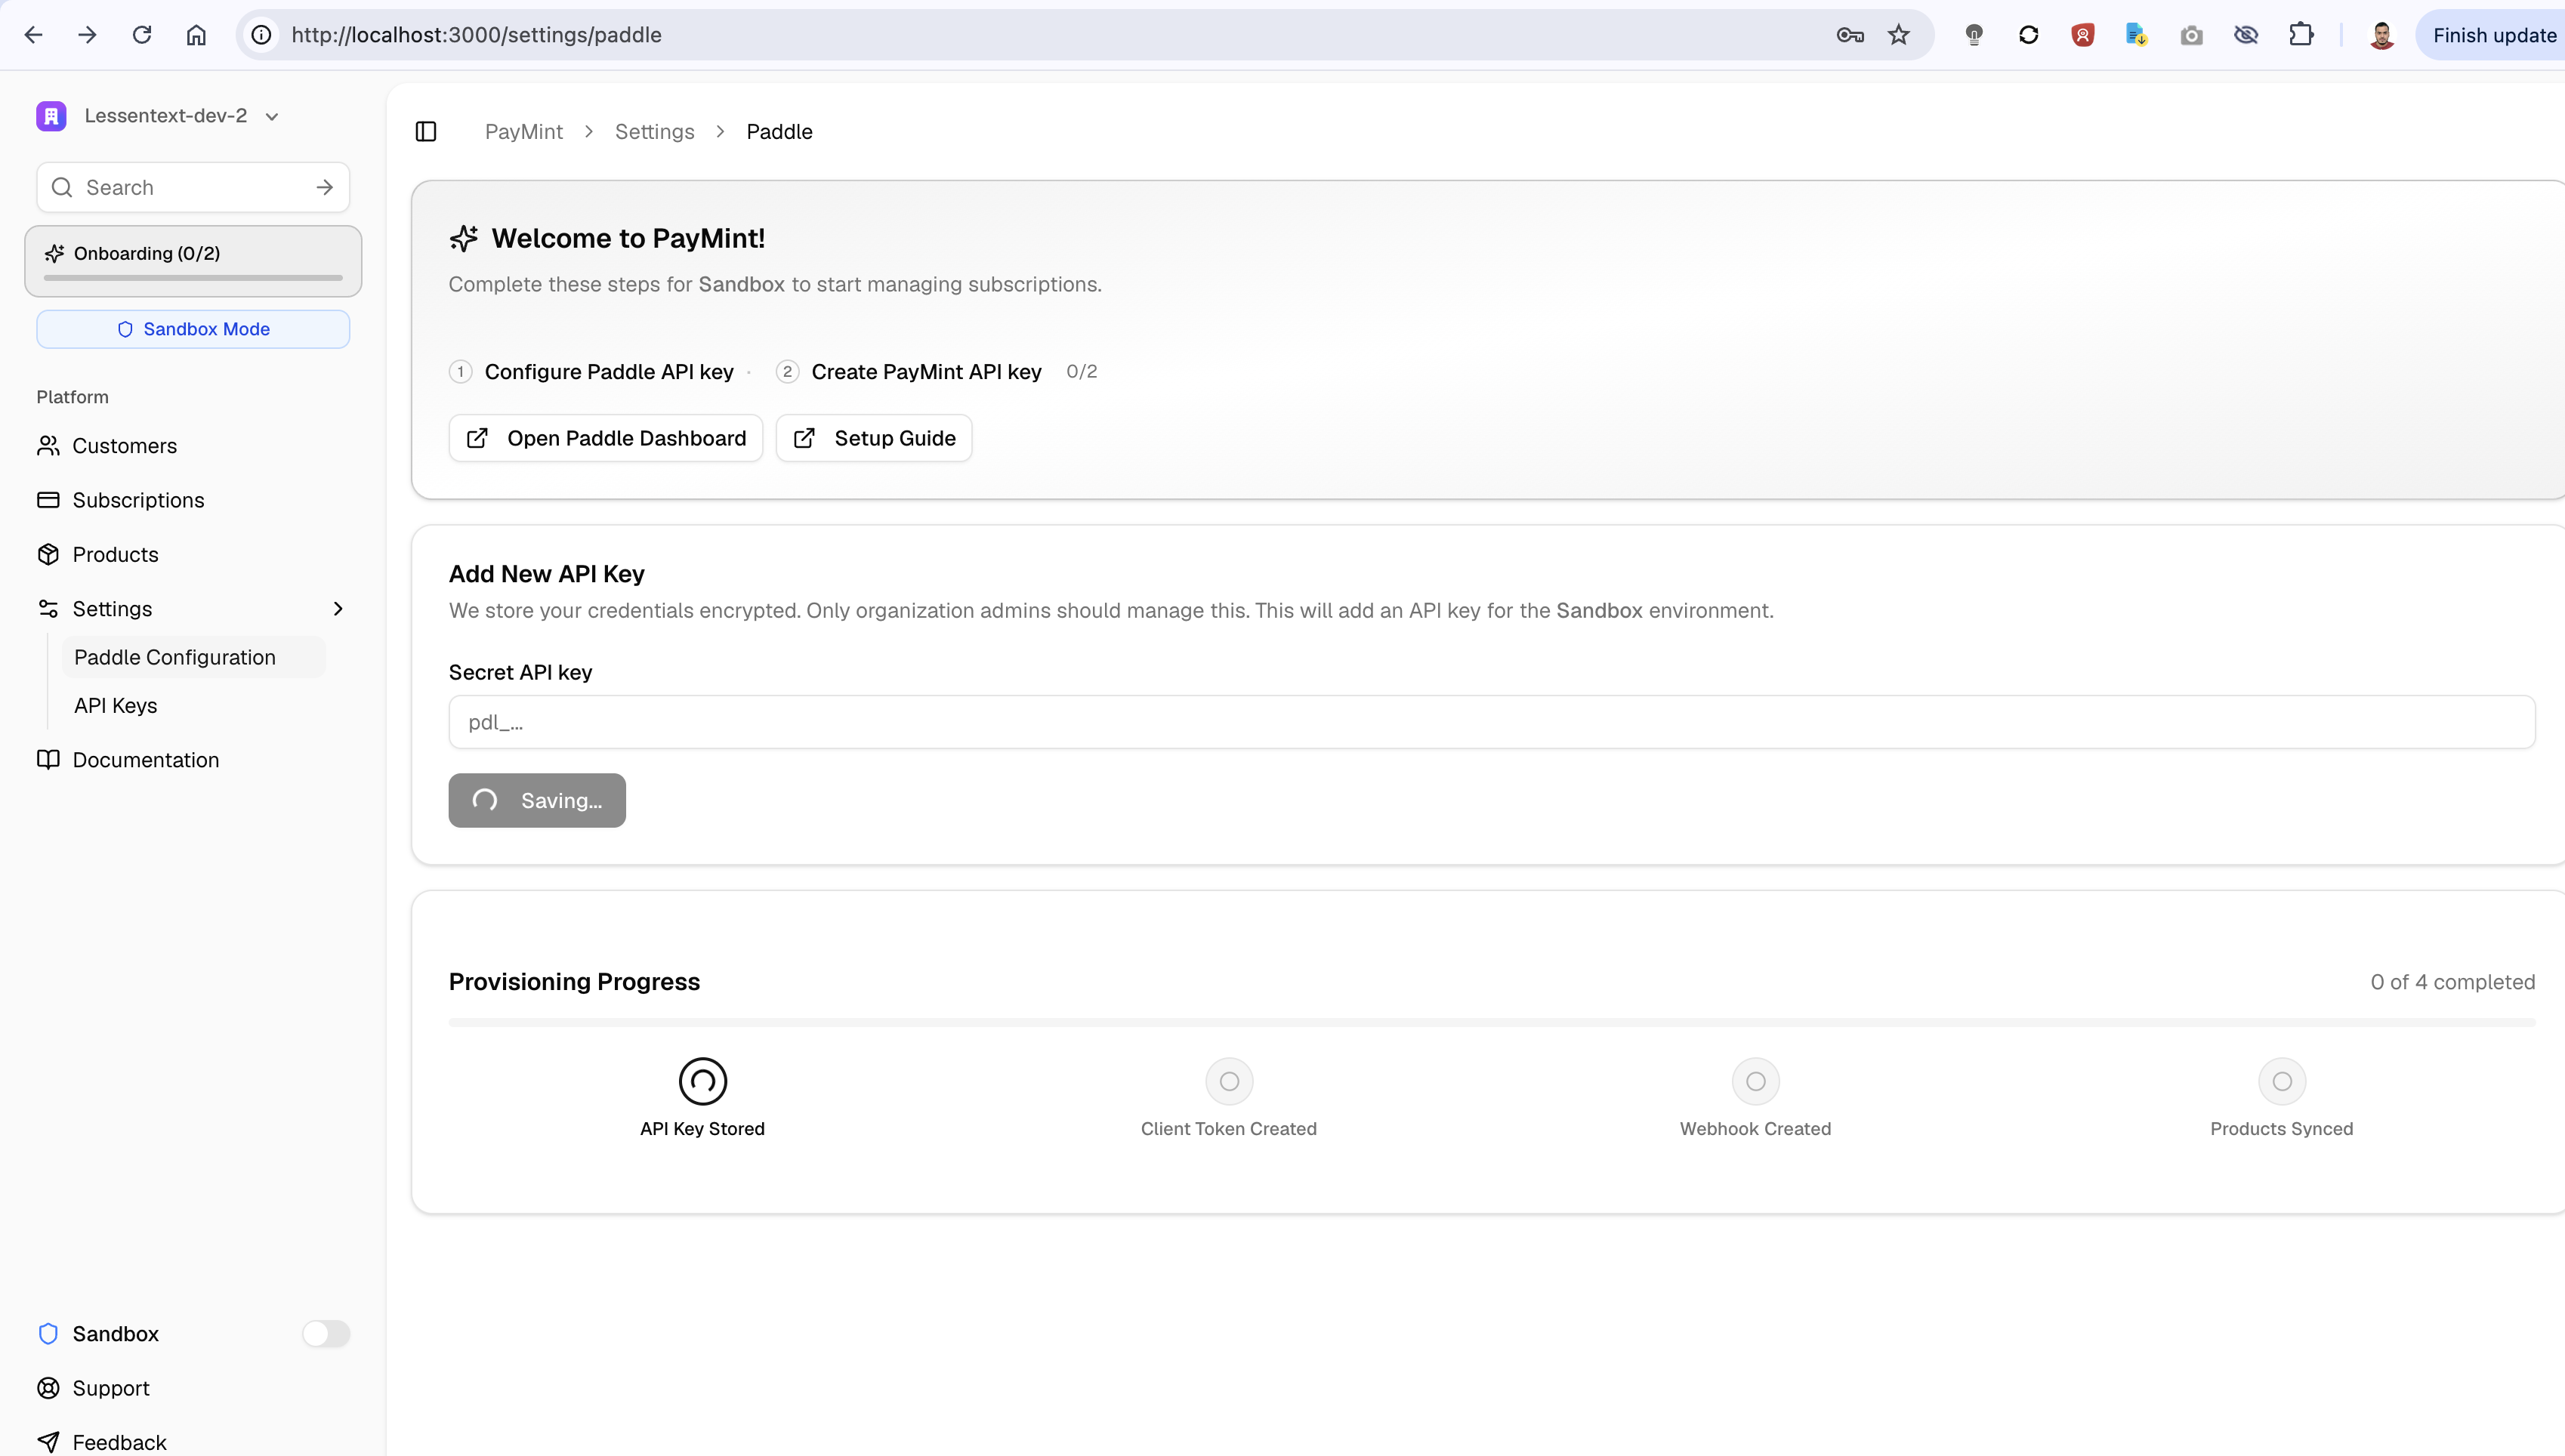 Paymint will automatically:
1. **API Key Stored** — Validates and securely stores your key
2. **Client Token Created** — Generates a frontend-safe token for Paddle.js
3. **Webhook Created** — Sets up real-time event processing
4. **Products Synced** — Imports your products and prices from Paddle
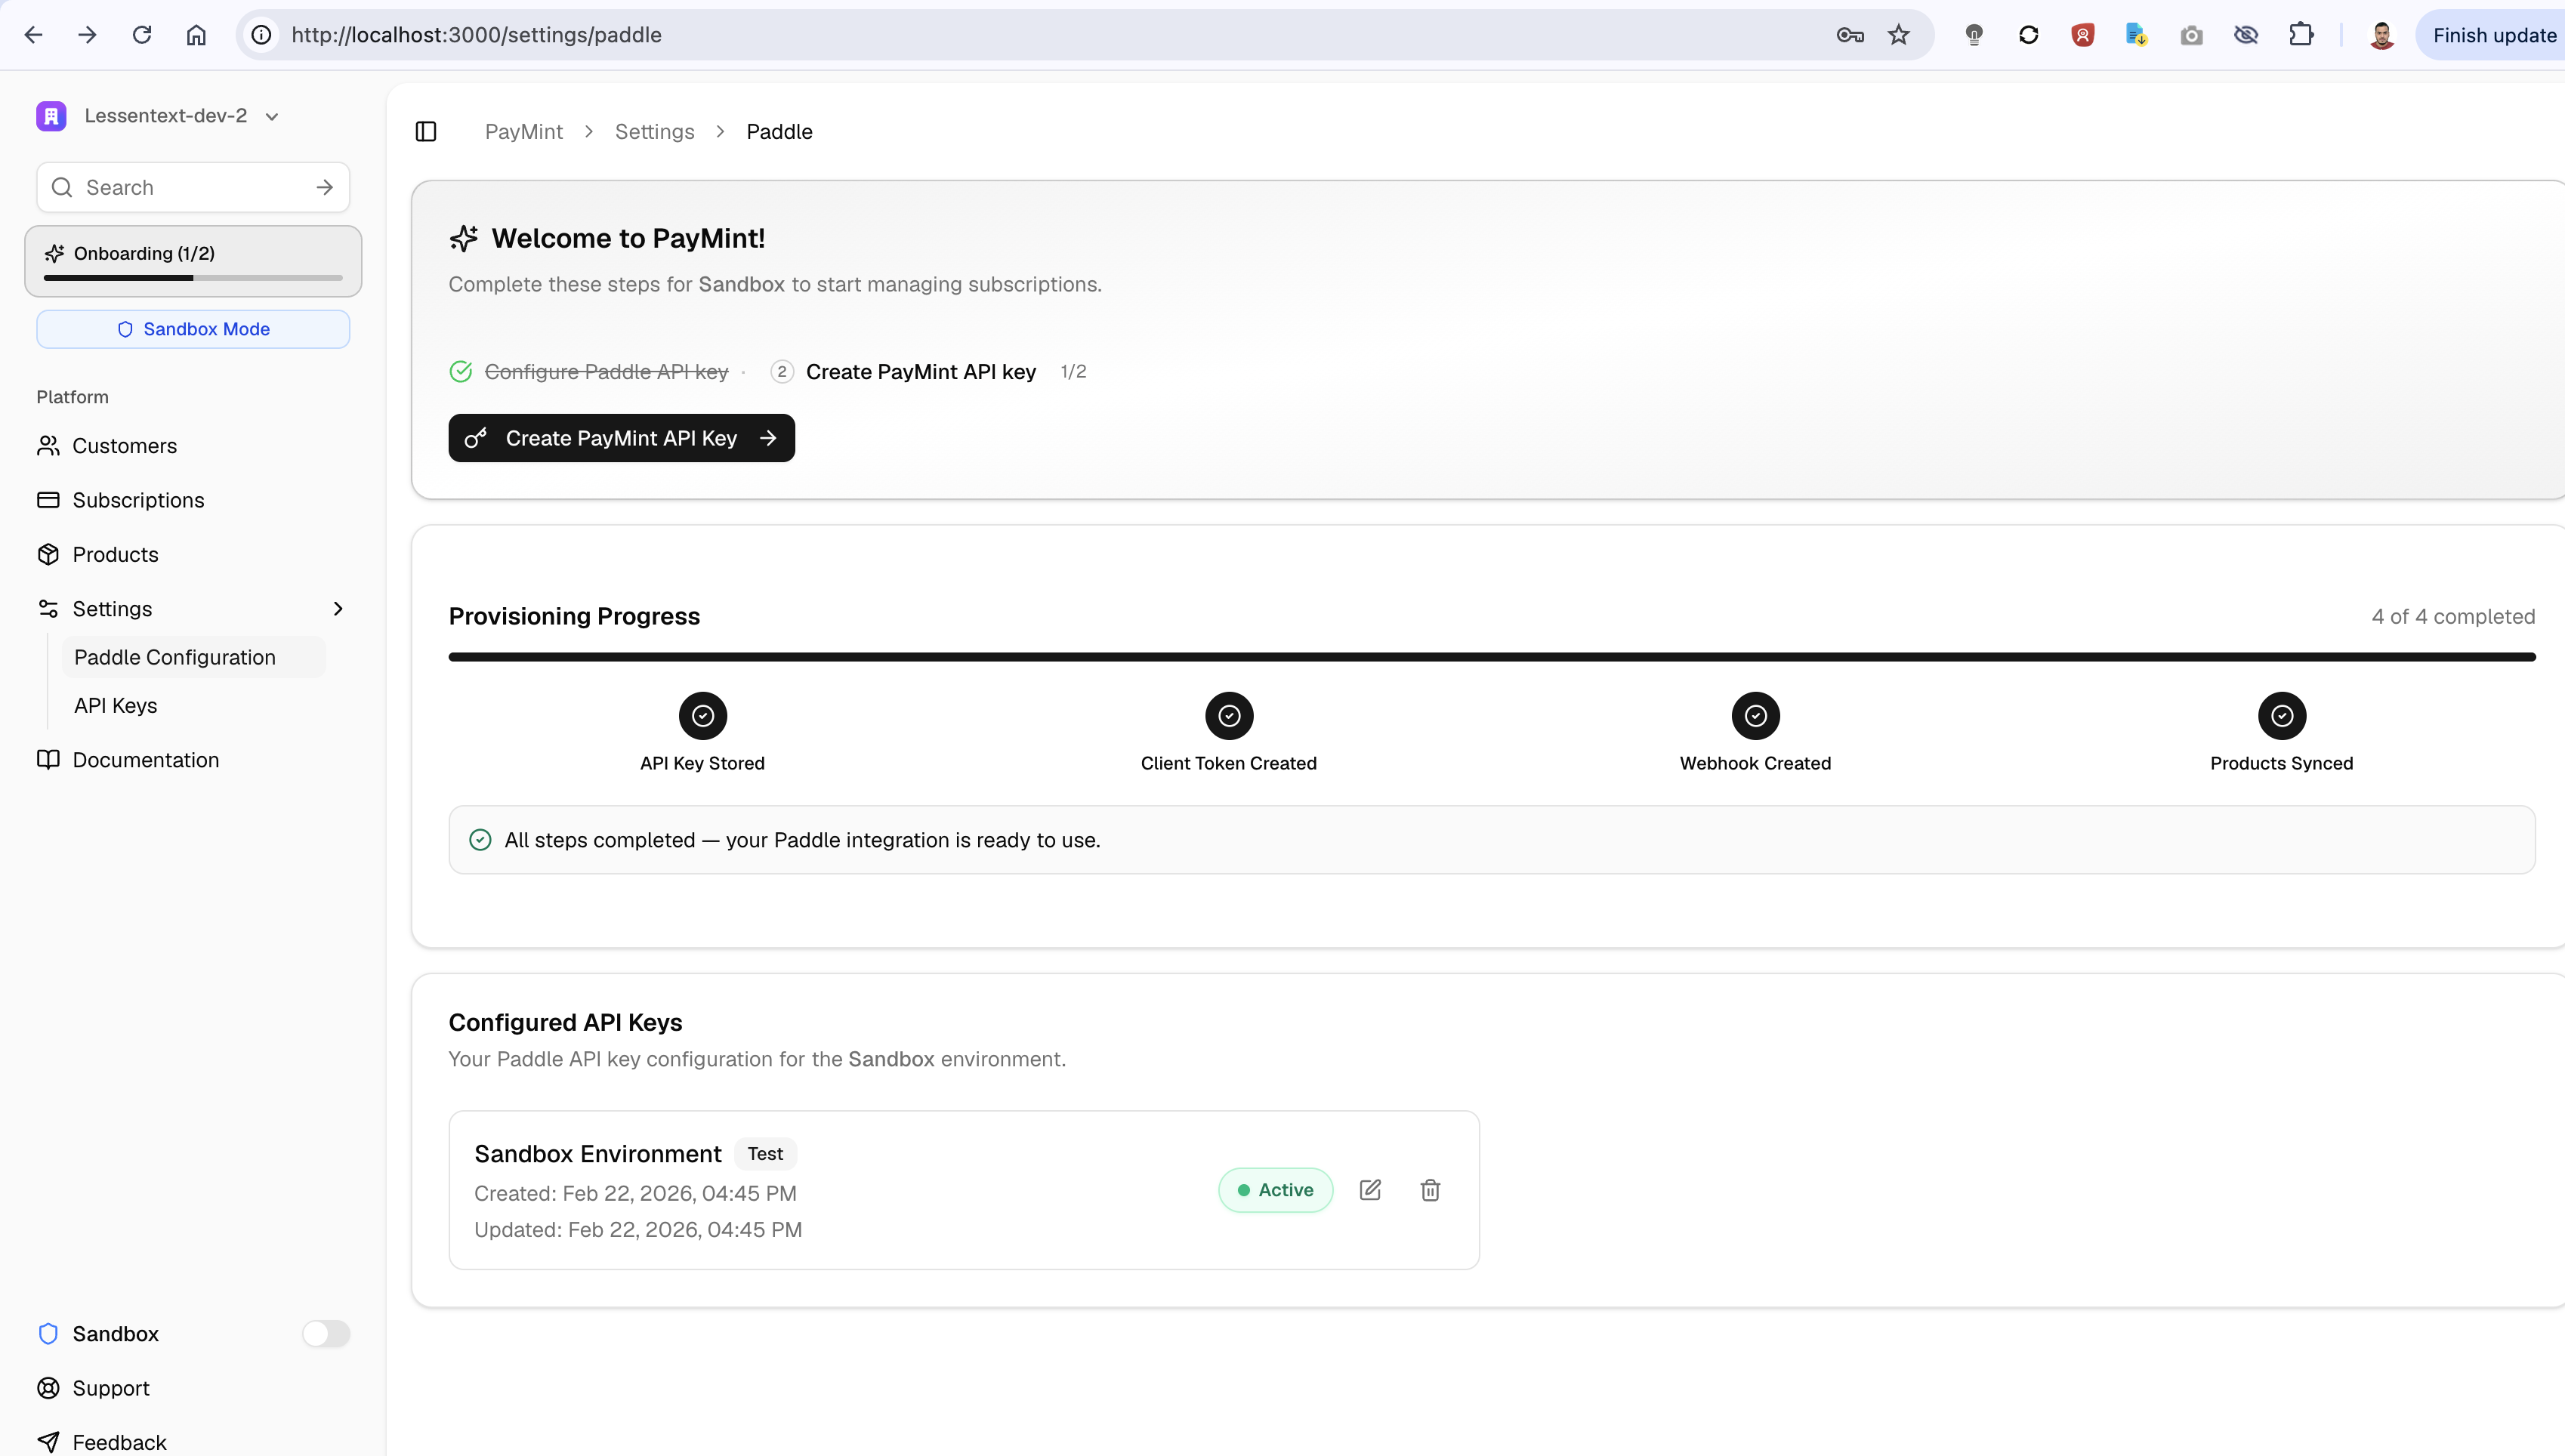
You'll see a progress indicator showing each step completing in real-time. Once all 4 steps are complete, your Paddle integration is ready to use.
Paymint will automatically:
1. **API Key Stored** — Validates and securely stores your key
2. **Client Token Created** — Generates a frontend-safe token for Paddle.js
3. **Webhook Created** — Sets up real-time event processing
4. **Products Synced** — Imports your products and prices from Paddle
You'll see a progress indicator showing each step completing in real-time. Once all 4 steps are complete, your Paddle integration is ready to use.
 ***
## Creating Products and Prices
Before starting the SDK integration, you need to have products and prices defined.
If you haven't already created products and prices in your Paddle dashboard, you can use **Paymint's Product & Price UI** to create them directly. Paymint will then automatically sync these to your Paddle account.
***
## What Paymint Provisions Automatically
Once you enter your API key, Paymint handles the following automatically:
| Feature | Description |
| -------------------- | ------------------------------------------------------------------------ |
| **Client Token** | A frontend-safe token for Paddle.js checkout integration |
| **Webhook Endpoint** | Receives real-time events (subscriptions, payments, etc.) from Paddle |
| **Product Sync** | Imports your products and prices (up to 20 products with 30 prices each) |
***
## Troubleshooting
### "Invalid API Key Format"
Make sure your key starts with `pdl_`. If you copied it from Paddle Classic (not Paddle Billing), it won't work.
### "Authentication Failed"
The API key may be expired or revoked. Generate a new one in **Developer Tools → Authentication** on your Paddle dashboard.
### "Provisioning Failed"
Check that your Paddle account is fully approved. Sandbox accounts are available immediately, but production accounts require Paddle's approval.
***
## Next Steps
Generate Paymint API keys for your application
See a complete end-to-end integration with code examples
***
## Creating Products and Prices
Before starting the SDK integration, you need to have products and prices defined.
If you haven't already created products and prices in your Paddle dashboard, you can use **Paymint's Product & Price UI** to create them directly. Paymint will then automatically sync these to your Paddle account.
***
## What Paymint Provisions Automatically
Once you enter your API key, Paymint handles the following automatically:
| Feature | Description |
| -------------------- | ------------------------------------------------------------------------ |
| **Client Token** | A frontend-safe token for Paddle.js checkout integration |
| **Webhook Endpoint** | Receives real-time events (subscriptions, payments, etc.) from Paddle |
| **Product Sync** | Imports your products and prices (up to 20 products with 30 prices each) |
***
## Troubleshooting
### "Invalid API Key Format"
Make sure your key starts with `pdl_`. If you copied it from Paddle Classic (not Paddle Billing), it won't work.
### "Authentication Failed"
The API key may be expired or revoked. Generate a new one in **Developer Tools → Authentication** on your Paddle dashboard.
### "Provisioning Failed"
Check that your Paddle account is fully approved. Sandbox accounts are available immediately, but production accounts require Paddle's approval.
***
## Next Steps
Generate Paymint API keys for your application
See a complete end-to-end integration with code examples